PREFACE
This report is based on the Peachtree Accounting Software 2004 Guidelines and Tutorials.
My objective of this report is to give our readers a sound knowledge about the accounting software. I have tried to brief some basics of Peachtree software that how to use this software.
The report is written in very comprehensive way to best guide the reader and for best understandability. Report consists of all the basics of using Peachtree Accounting Software and every task of software is explained in steps.
I hope this report will be helpful in increasing your knowledge about PEACHTREE ACCOUNTING software.
SYED M DAUD
This is the software which every company use to maintain accounting cycle…
If we want to start a new company than we have to select option 2 (set up a new company).
This picture will walk you through creating a new company.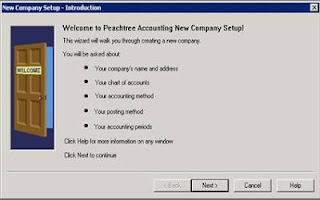
This picture is showing you the company info. You have to write company name, adress,phone no,website etc for starting a new company.
These are the methods to start a new company.
This is telling which method you want.
This page will open when we click on setup a new retail,construction,manufacturing or distribution company.These are the 5 available chart of accounts but we have to make are own chart of accounts that is why we are going back.
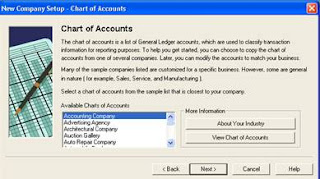
This page will open when we click the second option set up new co existive chart of accounts from one to many sample companies.the available chart of accounts are many as compairing to the previous page.
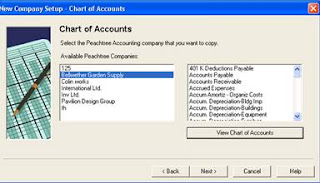
This page will open when we click third option copy settings fromexisting peachtree accounting company. These are the available companies and chart of accounts which are shown on this page but we have to make are own chart of accounts that is why we click back
.
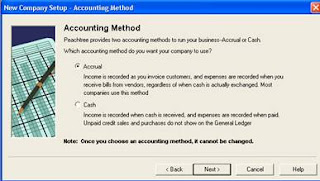
This page will open when we click 4th option. These are the two accounting methods. But we have to make are own chart of accounts that is why we click back
.
This page will open when we click 5th option.. but now we have to click next to go further.
This is the posting method in which company post its day by day data that is why we will click on real time option.
These are the two accounting periods.and we will choose any one of them.but we are choosing 12 monthly periods.
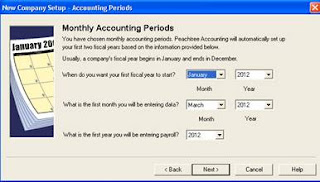
These are the monthly accounting periods.we select the month and the year according the company fiscal year. In the next option we select month and the year ,when we will start entering data.the next option shows are first payroll period
.
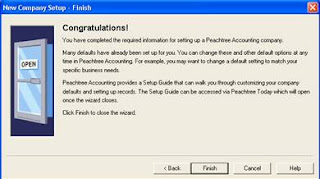
This picture shows that our company has been made
.
Maintaining charts of account
In this topic we learn how to maintain charts of accounts.
After you open window click on to maintain in menu bar and different options will appear.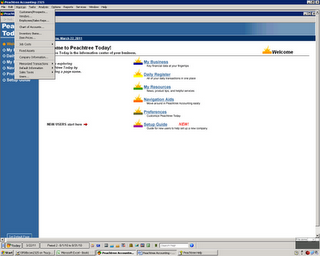
After clicking maintain several options will appear. Then click chart of accounts as shown in the picture.

Once you click chart of accounts then this page will open.
This page allows us to write account id, description, account type.
Account id: In account id we write account identification. It could be anything number or alphabets.
Description: In description we write account name.
Account type: In this tab we write account type (expenses, assets, liabilities etc) related to the account name.
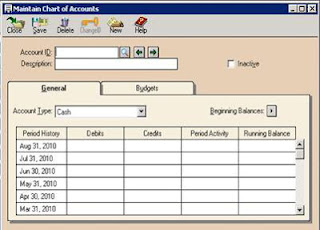
In this section we write beginning balances.
And then go to main menu and click maintain chart of accounts then this screen will appear.
Now in the above screen press button of beginning balance. And this small screen will appear.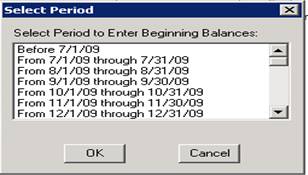
After selecting period of adjustment click on to “ok” then this screen will appear.
In this screen we have to enter the balances in the fourth and the fifth column. And after that the amount of both the columns should come equal and if not then this software will adjust it automatically.
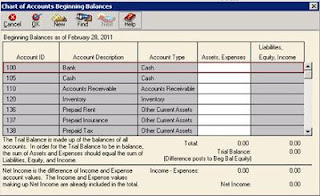
Note: before entering these opening balances one must create the account of retained earnings otherwise in the absence of the account of retained earnings your data will not be able to get save.
Maintain customer prospects
If you want to maintain customer prospects account. Then you go on tool bar and click on maintain. The following options come in front of you. After that you click on customer/prospects as shown in the picture
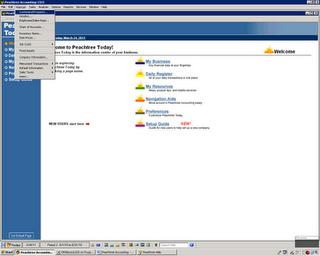
After clicking on maintain customer/prospects the following page will come in front of you. On this page you write the information regarding your customer (name, customer id, contact, address, zip code, telephone etc.)
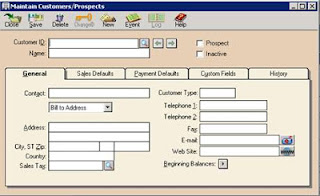
Sales defaults:
This page is for setting up a new sales defaults for a new customer.
1. In this page user will enter sales representative that has contact with the customer.
2. And in GL sales acct user can select the general ledger sales acct for the customer. And without this will not affect the sales transaction
.
Payment defaults:
If user want to set up a customer receipt setting for each customer than he must select payment defaults.
1. In cardholder name, if the user want to use a credit card from the customer for the payment.
2. Enter the information regarding the customer in address, city, state, zip code, credit card number in the following.
Custom fields:
User can use custom fields for adding contacts.
1. In second contact you have to write second contact related to the customer.
2. In reference you have to write a person’s contact who his related to the customer.
3. In mailing list you have to write the mailing addresses related to the customer.
History:
The history tab is used to check the past transactions of the customer.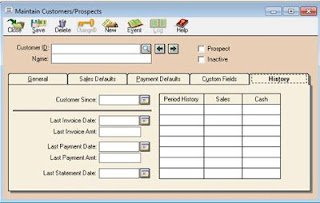
MAINTAINING CUSTUMER DEFAULTS
For the purpose of setting customer defaults information, we have to follow the following steps: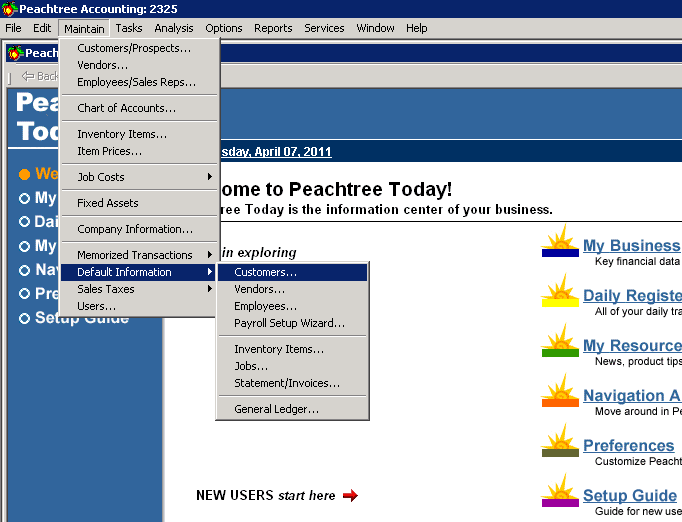
Go to the maintain menu and from in select the default info and click on customers, you will get a new window like the below one:
In this picture you can see the 5 tabs, Payment terms, Account Aging, Custom Fields, Finance Charges and Pay Methods.
Payment Terms
In standard terms, there are five options which include C.O.D, Prepaid, and Due in number of days, due on day of month, due at end of month: Select one of these to tell you the type of payment your customers make.
G/L Link Accounts
The defaults are used to link sales income and sales discount G/L accounts to most of your customers. You change individual customer setup, if necessary.
Account Aging
To set up how sales invoices are aged and what aging brackets will be used for accounts receivable, select the Account Aging tab in the Customer Defaults window.
In this window, there are two options:
Age Invoices by
Aging Categories
Age Invoices by
In this option, there are two methods either to select the invoice date or due date. If you select the invoice date, this will show you how old are the customer invoice and balance. If you select the method Due date, this will show you how much overdue is customer invoice.
Custom Fields
To set up custom field names for your customer records, select the Custom Fields tab in the Customer Defaults window
.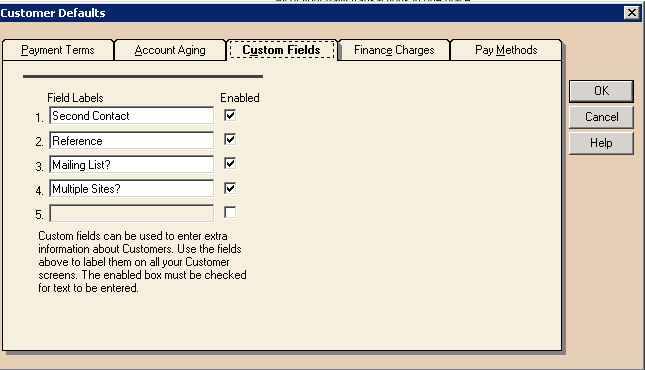
Custom fields let you use your imagination. What do I really need to know about my customers? Select the Enabled check box to enter or change the field label. If you decide not to use a field, clear the Enabled check box.
Finance Charges
In order to apply the finance charges, you have to check the check the box or you can set according to your own choice by applying it on the invoice according to your defined criteria.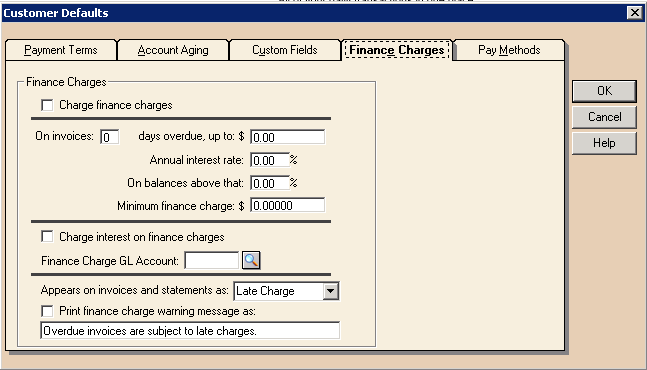
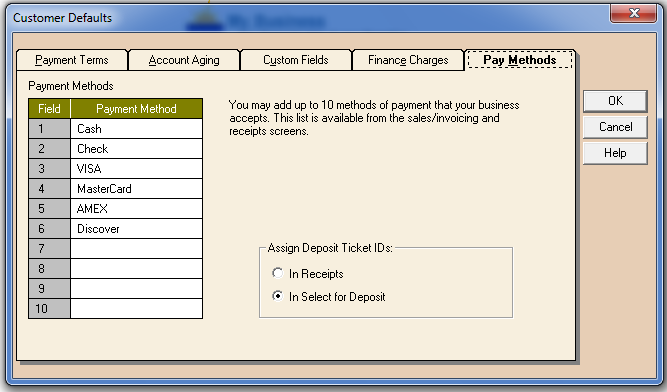
Pay Methods
This field header is used to set up payment methods for the customers; you can set up to 10 payment methods to facilitate the customer
.
Maintain vendor
Following are the steps to create a Vendor:
First of all go to the Maintain Menu and select the Vendors, you will get window of Maintain Vendor.
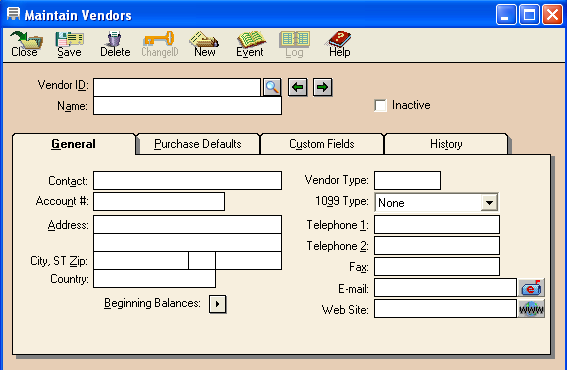
There are two fields: Header and Tab field.
In the Header field type the Vendor id and the name of the Vendor.
In the General tab, enter the general information about the vendor such as contact information, address, telephone and website etc.
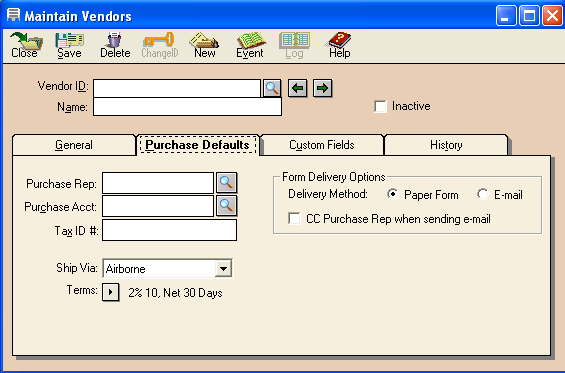
In the Purchase Defaults tab, most important is to select the GL Purchase Acct. to which the purchases will be charged, selection of shipping and delivery method
.
In the Custom Field tab, you can enter the additional information of the vendor.In the History tab, you can review the past transactions with the vendor.
VENDORS DEFAULT INFORMATION
Go to Maintain Menu and click the Default Information then select Vendors option, you will get following screen to enter the Vendors default information
.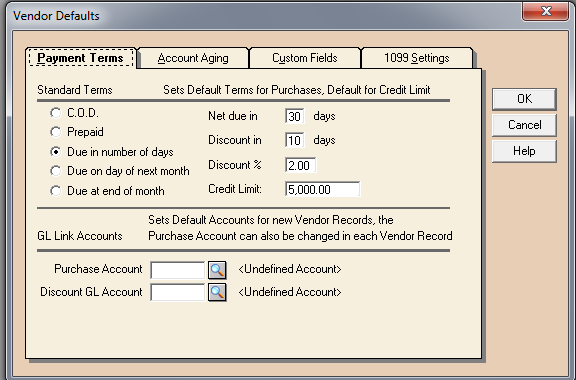
There are four tabs such as Payment terms, Account Aging, Custom Fields and 1099 settings.
In the payment terms, first you select the standard payment terms and provide the id information for the GL Purchase Acct and Discount GL Acct. in the GL Link Accounts.
In the Account Aging tab, you can either use invoice date or due date method to age the Account Payables or you can use aging categories to filter the payables by setting your own range.
In the Custom Fields, you can provide additional information of the vendor.
MAINTAIN INVENTORY
Before you are able to record transactions relating to inventory, you first need to set up your inventory items in Peachtree. This topic shows you how to add an inventory item into Peachtree, and how to modify or delete an item of inventory should the need arise.
Creating an item inside Peachtree is a very simple process:
Go to Maintain -> Inventory Items. The Maintain Inventory Items window appears.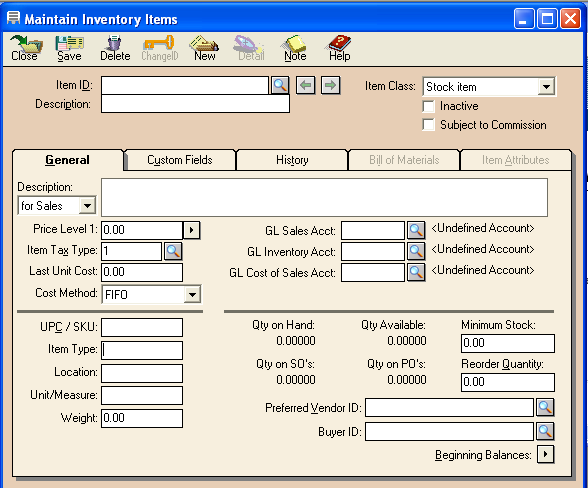
This displays the Maintain Inventory Items window where you can enter the details of the inventory item into Peachtree. The following screenshot show step-by-step instructions on how to enter an inventory item into the Maintain Inventory Items window in Peachtree
.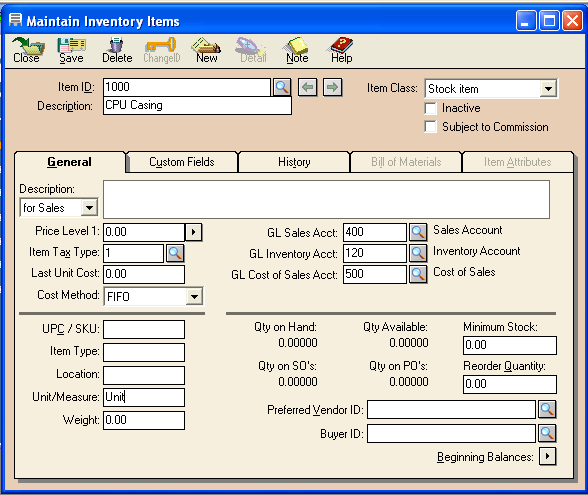
Item ID: Enter a short identification code for the item of inventory.
Description: Enter a short description of the item of inventory.
Item Class
Select the class of the item from the drop down list provided. For items of inventory to be resold you should select 'Stock item.
General Tab
Enter the relevant information about that item. Note that for stock items you do not need to enter information into the Last Unit Cost field. Peachtree will automatically update this field when you enter the beginning balances of inventory items into Peachtree. Notice that there are three general ledger account fields on the MAINTAIN INVENTORY ITEMS window: GL SALES ACCT, GL INVENTORY ACCT, and GL COST OF SALES ACCT. For a STOCK ITEM, none of these fields can be left blank.
Other tabs
Enter the required information in the other tabs. Note that if the Item Class selected is Stock item, you are unable to enter any information into the Bill of Materials tab or the Item Attributes tab.
Once you have entered the information in the Maintain Inventory Items window, remember to review your entries and save the item of inventory by clicking the Save icon.
ENTER THE BEGINNING BALANCES OF INVENTORY ITEMS
After adding the inventory item into Peachtree you will also need to enter the beginning balance of each item of inventory. You can either enter the beginning balance of each item as you create the item using the Maintain Inventory Items window.
To enter the beginning balance of each inventory item, click the Beginning Balances arrow down the bottom right hand corner of the Maintain Inventory Items window
.
This will open the Inventory Beginning Balances window. The following screenshot and description show step-by-step instructions on how to enter the beginning balance of an inventory item into the Inventory Beginning Balances window in Peachtree.
List of Inventory Items: Select the item of inventory from the list by clicking on it.
Item ID and Description: Note that the Item ID and the description of the item selected appear at the top of this screen, Confirm that you have selected the correct item.
Quantity: Enter the number of units of that inventory item on hand in the Quantity field.
Unit Cost: Enter the purchase price (unit cost) of one unit of that item of inventory.
Total Cost: Notice that Peachtree automatically calculates the total cost of that many items of that type of inventory.
remember to review your entries and click the OK icon to save the information and update the inventory totals.
SETTING UP AN ASSEMBLY ITEM
There are two steps to creating an assembly item:
1) Define the items (components) the assembly contains.
2) Build the assembly. Additionally, you can purchase prebuilt "assemblies."
From the Maintain menu, select Inventory Items. Peachtree displays the Maintain Inventory Items window. Enter the ID of the assembly, and select Assembly as the item class. An ID can be created from the Description you enter.
After you finish filling out the window, select the Bill of Materials tab. Select item IDs for existing stock items or assemblies only, and enter the quantity. Press ENTER. Do this for each item that makes up the assembly. When you're finished entering the assembly item, select the Save button.
When you are finished entering inventory items, select the Close button.
Next step is to enter the beginning of the stock items that make the assembly item. Select the Assembly item on the Maintain Inventory Items window; click the Beginning Balances arrow down the bottom right hand corner of the Maintain Inventory Items window.
In this way the process of making assembly is finished, now you can check it by going Tasks Menu and select the Assemblies.
Once you click on it, a window Build/Inbuilt Assemblies will be open.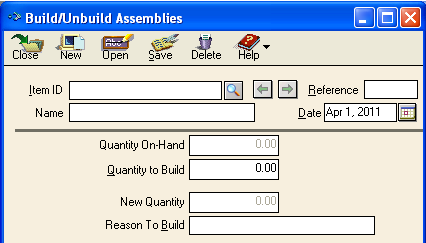
In this window, you have to give Assembly item id and the quantity to build, if you do not have the sufficient stock to build the required assemblies, a warning message will be appear that the assemblies cannot be made due to the insufficient stock.
QUOTES/SALES ORDER
Following are the steps for making quotes to the customer:
Go to the task menu and from Quotes/Sale order sub menu, select the Quotes tab.
First of all type the customer id in the customer id field for the customer.
After selecting the customer, bill to field will be filled automatically by the Peachtree software.
Next step is to enter the address detail for the delivery of goods.
Now select the date of issuing quotation.
In the goods through field, select the date till than the quote is valid.
The most important is to give the quotation number.
You can enter the customer purchase order number if it is provided, otherwise leave it blank.
Next step is to choose the shipping method, as far as terms are concerned these will be automatically appears when you select the customer.
Next step is to enter the quantity required, select the item for which you are quoting the quote and description appears automatically.
Now enter the unit price of the item, once you enter the price Peachtree calculates amount automatically.
In the bottom, there are two options such as sales tax and freight charges. You can enter the both.
Once you have entered the information click the save icon.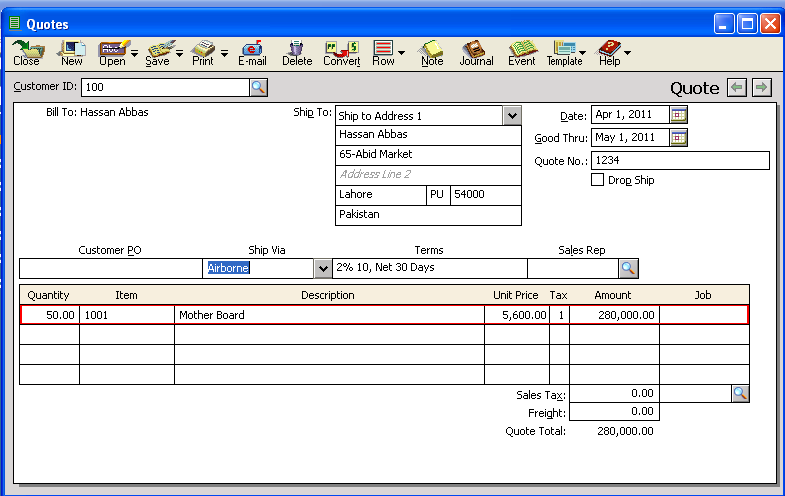
Conversion of Quotes to Sales Order
Go to the task menu and from Quotes/Sale order sub menu, select the Quotes tab.
Click on the Open button to see a list of created quotes and select the one to be converted.
Next step is to change the date of quote.
Now click on the convert button, a dialog box will be open with the three radio button options.
Select the third radio button and enter the sale order number in the SO # field. Click the save button to record the transactions.
After the conversion, you will not find it in the quote window but from sales order window you can check it.
- SALES ORDER
- Enter the customer id or click the lookup button to see a list of customers.
- Once selected, bill to field will be completed automatically and you can enter the ship to detail.
- Next step is to select the date of making sale order.
- Now click the calendar icon to select the date by which the goods are required to have shipped.
- Next and important step is to enter the sale order number, can also enter the customer purchase order number if known but not compulsory.
- Next step is to enter the quantity required, select the item of the inventory ordered and description appears automatically.
- Now enter the unit price of the item, once you enter the price Peachtree calculates amount automatically.
- In the bottom, there are two options such as sales tax and freight charges. You can enter the both.
- Once you have entered the information click the save icon to record the sales order
- Enter the customer id or click the lookup button to see a list of customers.
- The Bill To and Ship To field will be automatically filled by Peachtree but however you can change it.
- If against the customer selected had already issued a sale order, tab will shift to apply to Sales order. After selecting the sale order, change the date, enter the sale invoice no. and enter the quantity on the each line of shipped column and click on the save button to post the transaction.
- However you can also record direct sale invoice, for this forget about the step no.3 and follow the remaining steps.
- Now select the date of making sale invoice and enter the sale invoice no. in the sale invoice field.
- Enter the number of units of the first inventory item sold.
- Type in the Item ID of the item of inventory sold.
- When you select the item id, Peachtree automatically fills the description field.
- Peachtree automatically calculates the GL Account, Unit Price and Amount column with the default information provided however you can change it according to need.
- You can enter the Sales tax and freight charges, Peachtree automatically populates the total invoice value.
- After making the above adjustments click the save button to post the transaction.
- RECEIPTS
- First of all select the customer id and Peachtree will automatically displays the address of the customer.
- Once you selected the customer, Peachtree automatically displays a list of the customer's outstanding invoices.
- Next step is to enter the Reference and Receipt No.
- Now select the date on which you have received the payment.
- Select the method of payment from the drop down list provided and appropriate cash account.
- If the customer has paid the full amount of the invoice, then click the Pay box for that invoice to enter a check mark in that column.
- If the customer only made a partial payment against a particular invoice, type in the amount of that payment in the amount paid column.
- Last step is to click on the save icon to post the transaction.
-
PURCHASE ORDER
A Purchase order is a written document issued by buyer to seller indicating items, quantities and prices for the products or services the seller will provide to the buyer.
Recording Purchase Order
This topic shows you where and how to record details of a purchase order in Peachtree. To record a purchase order in Peachtree, open the Navigation Aids on the Peachtree today window as shown below: Click on navigation aids and selects the Purchase section and now click on the Purchase order.
- Another way to open the Purchase order is
- 1-Go to the Task Menu
- 2-Click on the Purchase order, a Purchase order screen will appear.
Purchase Order Window
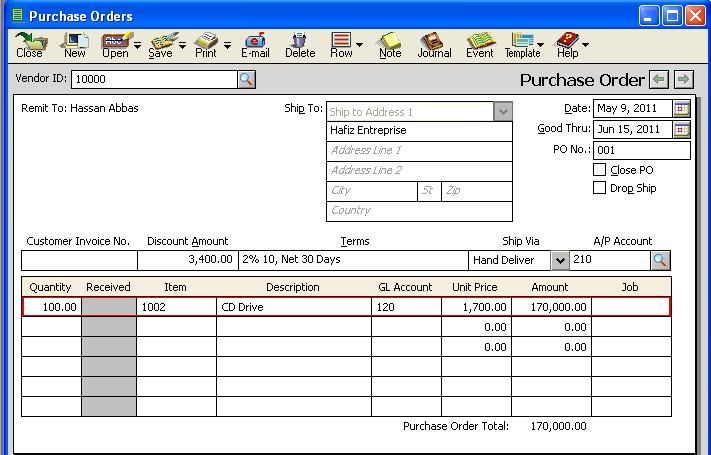
Select the vendor id, who will supply the goods.
Once you select the vendor id, “Remit To and Ship To” fields will be completed automatically by the Peachtree.
Next step is to select the purchase order date.
As you select the purchase order date, Peachtree automatically estimates the good through date as 30 days however, you can change it.
It is essential to enter the purchase order number, do not leave it blank.
Enter the specific quantity required to be ordered.
Select the item that is required and the description field automatically fills as you select the item. Whereas Peachtree automatically estimates the GL Account, Unit Price and amount with the default information specified when that item was created.
Once you complete all of the above steps, click the save button to record the purchase order however these entries are not posted to the general ledger until the goods received information is posted.
PURCHASE / RECEIVE INVENTORY
Once you have made the purchase order, the next step is to receive the inventory against that purchase order and to record in the Peachtree software.
Following are the steps to record received inventory:
Choose the task menu and click on Purchases/Receive Inventory.
Type the vendor id or click on look up button to see list of vendors and select the one, if you had entered a purchase order against him, Peachtree displays the Apply to Purchase order tab. After you select a vendor, Peachtree automatically fills the Remit to and Ship to fields.
Select the date of receiving inventory.
Then type the invoice number, which is very important. If you receive inventory without invoice then check the waiting on bill but if you received both inventory and bill leave the box unchecked.
Now on the apply to purchase order no. tab, click the drop-down list and select the Purchase Order against which you have received the inventory.
If you select a vendor against which no purchased or is issued, you can enter a purchase without any PO in the Apply to Purchases tab. Sometimes you call your vendor for the item that is not mentioned on PO but on the purchase invoice you can add them here. Click the save button to post the transaction.
PAYMENTS
Choose the task menu and click on Payments.
Select the id or name of the vendor, Peachtree automatically displays the name and address of the vendor.
When we select the vendor, Peachtree displays a list of purchase invoices that are still to be paid in the Apply to invoices tab. If a check is paid for an invoice then type the check no. in the check number field.
Select the date of payment.
In the Apply to Invoices tab, you may have more than one outstanding invoice and for the payment you can click the box in the Pay column for the full payment of that invoice; however you can make the partial payment type in the amount in the amount paid column. Click the save button to post the transaction.
VENDOR CREDIT MEMO (PURCHASE RETURNS)
Vendors Credit Memo is used to record the returns to the Vendors whether on the direct purchases or on the existing invoices which have not been paid.
Let see how to record “Returns to Vendors” in Peachtree Accounting Software
- Go to task menu bar and click on Vendor credit memo, vendor credit memo window will open.
- Enter the vendor ID in the “Vendor ID” field to whom these Returns are made.
- Enter the date of returning goods in the “Date” field.
- Enter the Reference no. for the transaction in the “Credit no.” field; it must be a distinct number to avoid any errors.
- The “Terms” field will be automatically filled with the payment terms of the vendor whose ID is enter, these are the terms that were selected when the vendor was created.
- Enter the Account Payable account number in the “A/P Account” field to which this transaction will be charged.
Now, if there are any invoices pending on that vendor then “Apply to Invoice No.” tab will be activated, otherwise user can only enter returns in the “Apply to Purchases” tab.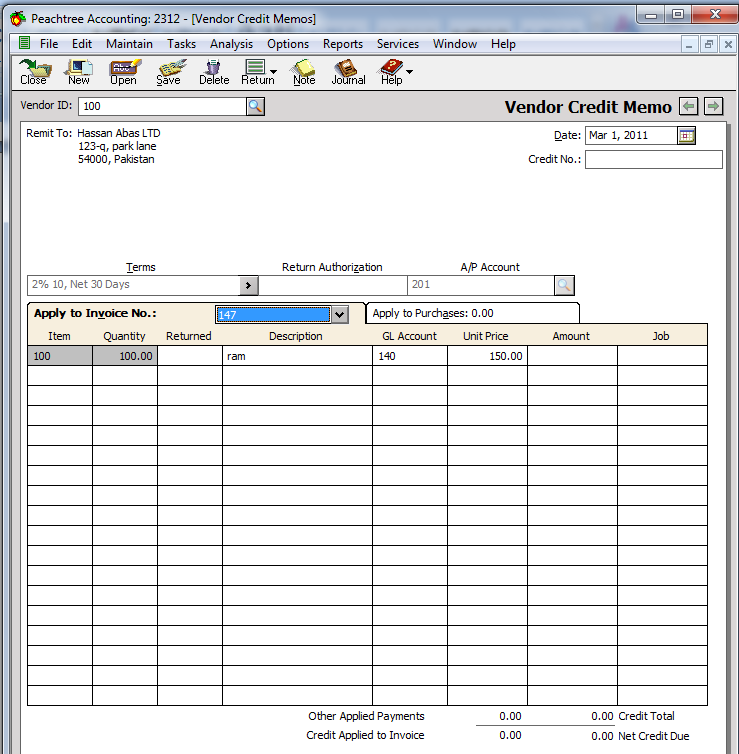
Select the “Invoice no” from the drop down list on the Apply to Invoices tab to whom you want to charge the returns.
The Item field, Quantity field, Unit Price field and Description field will be automatically filled with the details of Invoice no. selected.
Enter the no. of items you want to return in the “Returned” field.
Select the Inventory Account in the “GL Account” field.
- The “Amount” field will be calculated by multiplying Returned field with the Unit Price field.
- Click on “Save” button to save the transaction.
CREDIT MEMO (SALES RETURN)
Credit Memo is used to record the returns from the customers whether on the direct sales or on the existing invoices whose payments are not received.
Let see how to record “Returns from Customers” in Peachtree Accounting Software
- Go to task menu bar and click on Credit Memo, credit memo window will open.
- Enter the Customer ID in the “Customer ID” field who have Returned goods.
- Enter the date of returning goods in the “Date” field.
- Enter the Reference no. for the transaction in the “Credit no.” field; it must be a distinct number to avoid any errors.
- The “Terms” field will be automatically filled with the payment terms of the Customer whose ID is enter, these are the terms that were selected when the Customer was created.
- Enter the Customer Purchase Order No. in the “Customer PO.” field against which the sales was made.
Now, if there are any invoices pending on that Customer then “Apply to Invoice No.” tab will be activated, otherwise user can only enter returns in the “Apply to Sales” tab.
- Select the “Invoice no” from the drop down list on the Apply to Invoices tab to whom you want to charge the returns.
- The Item field, Quantity field, Unit Price field and Description field will be automatically filled with the details of Invoice no. selected.
- Enter the no. of items that are returned in the “Returned” field.
- The “Amount” field will be calculated by multiplying Returned field with the Unit Price field.
- Click on “Save” button to save the transaction.
GLOBAL SETTINGS
Go to Options Menu and click on “Global”, following window will open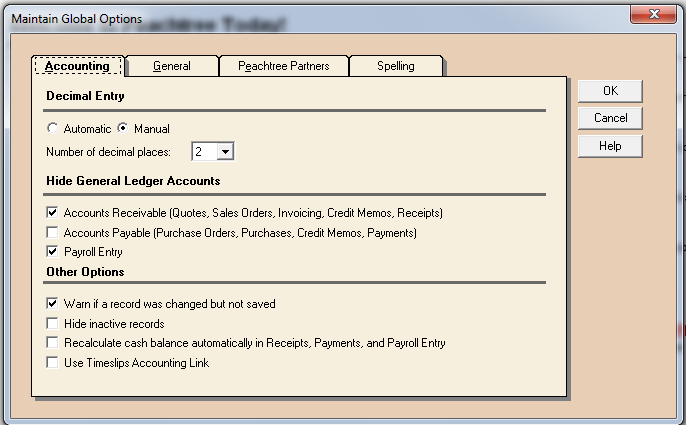
Following Tabs will be available on the Global Options window:
Accounting
General
Peachtree Partners
Spellings
Accounting Tab
Under this tab user can select the number of decimal places to be used in entering numbers in the software, if selected manual then user has to give decimals manually (no interference of software). But if we select automatic option, then software will automatically place the decimals in the numbers entered. User can select no. of decimal places from the drop down menu.
User can also hide the Account Receivable Field in Sales Orders, Quotes, Invoices, Credit Memo for Internal Control Purposes. Account Payable Field can also be hide from Purchase Order, Credit Memo and Payment windows by clicking on the check box.
Other prompt options can also be customize in this tab.
General Tab
General tab is used to set the software interface options; different Color Schemes are available for the software.
Improve performance is used to selecting options for improving the software processing time.
User can select One Line Item Entry Display to view only one horizontal line and Two Line Item Entry Display to view two lines in various task windows i.e. Purchase Orders, Sales Orders, Payments, Invoices, etc.
One Line Display
Two Line Display
Smart Data Entry is used to enable the automatic field completing and automatic drop down list opening
Spelling Tab
This tab is used to customize the spellchecker of the software and to select from three different dictionaries which will be used by the software for spell checking i.e. American, British and Canadian Dictionaries.
No comments:
Post a Comment